How to Reupholster a Chair to Match Your Home’s Architectural Style

Reupholstering a chair can be a rewarding DIY project that breathes new life into an old piece while perfectly complementing your home’s unique architectural style. Whether your space features mid-century modern clean lines, rustic farmhouse charm, or classic Victorian elegance, choosing the right fabric and finishing touches can make a chair feel like it was custom-built for your home.
In this guide, we’ll walk through how to reupholster a chair with your architectural style in mind. You’ll learn tips for selecting fabrics, tools you’ll need, and the step-by-step process to help you create a stunning piece that’s both functional and stylish.
Why Reupholster Instead of Buying New?
Before diving into the “how,” it’s worth asking why reupholster a chair at all? Here are a few compelling reasons:
- Cost savings: Upholstering can be more affordable than buying a brand-new designer chair.
- Sustainability: Revamping old furniture is eco-friendly and reduces waste.
- Customization: You get to select fabric and details that perfectly match your style.
- Sentimental value: Give new life to heirloom or favorite chairs that hold memories.
- Quality: Many older chairs have superior build quality that’s worth preserving.
If any of these reasons resonate, then reupholstering is a great project to consider.
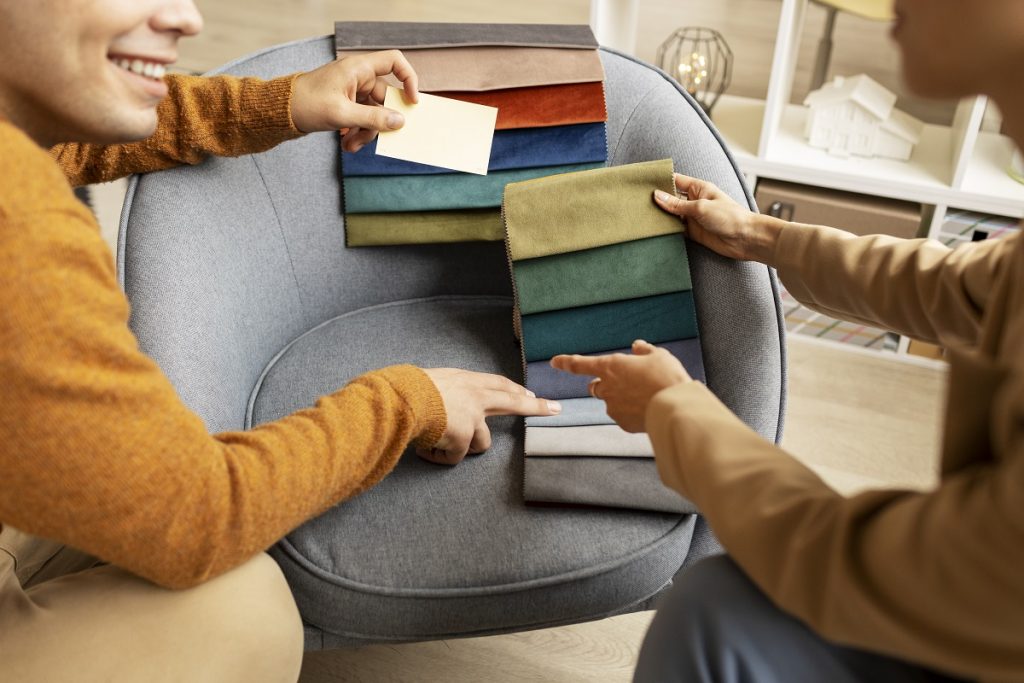
How Do You Choose Fabric That Matches Your Home’s Architecture?

Your home’s architectural style sets the tone for your entire interior, including the furniture fabrics. The key is to select upholstery fabric that enhances and complements the style, color palette, and overall vibe of your space. Here’s a deeper dive into fabric choices tailored to popular architectural styles:
1. Mid-Century Modern
- Fabric Choices: Opt for tactile fabrics like tweeds, wool blends, or smooth linens. These materials feel natural and sturdy without being overly formal.
- Patterns: Geometric prints, chevrons, and abstract shapes echo the clean lines and functional aesthetics of mid-century design. Avoid overly floral or busy patterns here.
- Colors: This style loves warm, earthy hues mixed with bold accent colors—think mustard yellow, olive green, burnt orange, and warm neutrals like beige or caramel. These shades bring vibrancy while maintaining harmony.
2. Traditional/Victorian
- Fabric Choices: Rich, luxurious fabrics such as velvet, damask, brocade, and tapestry bring a sense of opulence. These materials often have a heavier weight and a beautiful texture.
- Patterns: Intricate florals, elaborate motifs, and damask prints reinforce the elegance and ornate details typical of Victorian and traditional homes.
- Colors: Deep jewel tones dominate here—emerald green, burgundy, navy blue, with accents of gold or brass. These rich colors enhance the grandeur and warmth of the space.
3. Rustic/Farmhouse
- Fabric Choices: Look for natural, organic textiles like linen, burlap, cotton canvas, and distressed leather. These give a casual, lived-in feel.
- Patterns: Plaids, checks, and simple stripes add a homespun charm without feeling fussy or overdone.
- Colors: Earthy and muted tones—beige, cream, taupe, soft sage greens, and faded blues—mimic the natural palette of farmhouse architecture and countryside settings.
4. Contemporary/Minimalist
- Fabric Choices: Sleek and smooth is the goal. Consider leather, microfiber, or tightly woven cottons with a refined finish. These materials provide a polished yet understated look.
- Patterns: Mostly solid colors or subtle textures like herringbone or linen weaves. Avoid busy prints to keep the space feeling calm and uncluttered.
- Colors: Neutral and monochromatic palettes dominate—think shades of gray, black, white, and muted pastels. These tones emphasize simplicity and light.
5. Coastal/Beach
- Fabric Choices: Lightweight fabrics like cotton, linen, and even seagrass-textured textiles evoke a breezy, relaxed atmosphere.
- Patterns: Nautical stripes, coral or shell prints, and palm or seaweed motifs tie in coastal themes naturally.
- Colors: Soft blues, sandy beige, seafoam green, and crisp whites reflect the ocean and beach landscape, creating an airy and inviting feel.
When choosing fabric, always consider the chair’s intended use as well. For example, if it’s in a high-traffic living area, durability and ease of cleaning are crucial.
What Tools and Materials Do You Need for Reupholstery?
Having the right tools and materials ready before you begin will make your reupholstery project more enjoyable and less stressful. Here’s an expanded checklist with tips:
- Staple Gun and Staples: A heavy-duty staple gun designed for upholstery is essential. Use staples that are the right size for your chair frame thickness.
- Upholstery Fabric: Buy 10-20% more fabric than you estimate to allow for cutting errors or pattern matching. Choose a fabric rated for upholstery use for durability.
- Upholstery Foam or Batting: If the existing cushion is worn or compressed, replacing or adding foam and batting will bring comfort back. Consider high-density foam for longer-lasting support.
- Screwdriver and Pliers: Needed to remove the chair seat and pull out old staples or tacks safely.
- Scissors and Utility Knife: Sharp scissors for cutting fabric and a utility knife for trimming foam or batting.
- Upholstery Tacks or Decorative Nails (Optional): For adding stylistic accents or securing fabric in hard-to-staple areas.
- Sewing Machine (Optional): Handy for creating removable cushion covers or finishing raw edges neatly.
- Needle and Upholstery Thread: Strong, heavy-duty thread for hand stitching any areas that can’t be machine sewn.
- Tack Remover or Flat Pry Bar: To carefully remove old staples and tacks without damaging the wood frame.
- Measuring Tape: To take accurate measurements of fabric and foam sizes.
- Chalk or Fabric Marker: For marking cutting lines on fabric without leaving permanent marks.
- Gloves (Optional): Protect your hands from staples, sharp edges, or irritation from fabrics.
Gathering these tools upfront will keep your work organized and efficient.
How Do You Prepare Your Chair for Reupholstering?
Good preparation is the foundation of a successful reupholstery project. Here’s a detailed process for prepping your chair:
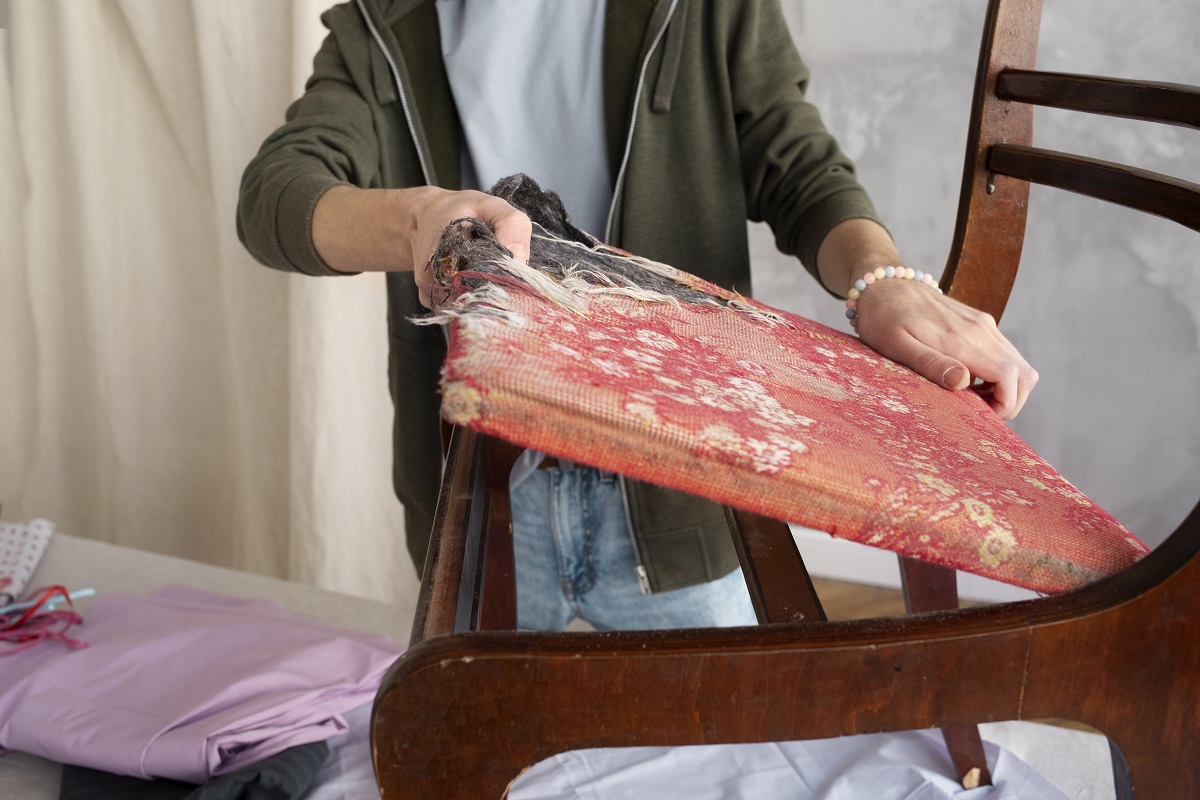
Step 1: Remove the Old Fabric
- Turn your chair upside down or on its side to access the underside.
- Identify all staples, tacks, and any glued spots holding the fabric in place.
- Use a staple remover, flathead screwdriver, or pliers to gently pull out staples—work slowly to avoid damaging the wood frame.
- Peel back fabric sections carefully; take note of how fabric was applied for reference when you install the new fabric.
- Save the old fabric pieces to use as templates for cutting your new fabric.
Step 2: Inspect the Frame and Cushion
- Check the chair frame for stability. Wiggle the legs and joints to see if any screws need tightening or if wood glue is needed to reinforce loose joints.
- If the foam cushion is worn, flat, or crumbling, plan to replace it with new upholstery foam.
- Clean the chair frame thoroughly by wiping down with a damp cloth to remove dust, dirt, or old adhesive residue.
Step 3: Take Measurements and Make Templates
- Use a tape measure to record the dimensions of each fabric section (seat, back, arms).
- Lay out the old fabric flat and trace it on butcher paper or kraft paper to create cutting templates. This helps avoid errors and ensures pieces fit perfectly.
- Label each template piece clearly to stay organized.
Good prep will save you headaches down the line and help ensure a smooth reupholstery process.
How to Reupholster a Chair Step by Step
Video Source
Reupholstering a chair can seem intimidating at first, but breaking it down step-by-step makes the process manageable and enjoyable. Here’s a detailed walkthrough of the main steps once your chair is prepped and ready:
Step 1: Cut New Fabric
Using your paper templates or the old fabric pieces as a guide, carefully cut your new upholstery fabric.
- Leave a 2-3 inch margin around each piece to give yourself enough material for stapling, folding, and tucking securely around the chair’s edges.
- Make sure your fabric is laid flat and smooth to avoid cutting crooked edges or uneven pieces.
- If your fabric has a directional pattern or nap (like velvet), align your templates accordingly to keep the pattern consistent on all pieces.
Step 2: Replace Foam or Padding (If Needed)
If your chair’s foam or padding is flattened, worn out, or uncomfortable, now is the time to replace it.
- Measure and cut upholstery foam to fit exactly on the seat or backrest. High-density foam is recommended for durability and comfort.
- Wrap the foam in batting—a soft, fluffy layer that smooths out sharp edges and adds extra cushioning. Batting also helps the fabric lay more evenly.
- Use spray adhesive (optional) to secure the batting to the foam if it shifts during upholstering.
Step 3: Attach the Fabric
Start upholstering with the largest sections first, usually the seat.
- Lay your fabric face down on a clean surface, then place the foam and batting on top, and finally position the chair seat on the foam.
- Pull the fabric taut but not overstretched, and begin stapling underneath the seat frame. Start by stapling at the center of one side, then move to the opposite side to evenly distribute tension.
- Continue stapling towards the corners, alternating sides to avoid wrinkles or bunching. Use your hands to smooth out fabric as you staple.
- For corners, fold the fabric neatly like wrapping a present or create small pleats to keep the fabric smooth and neat.
Step 4: Upholster the Back and Arms
Once the seat is secure, move on to upholstering the backrest and armrests.
- Use the same method of pulling fabric tight and stapling from the center outwards.
- Pay close attention to curves and corners. Fabric manipulation here is key for a polished finish.
- For rounded or irregular shapes, small folds or darts may be necessary to fit the fabric smoothly.
- Tuck any excess fabric under the frame and secure with staples or upholstery tacks if staples won’t hold.
Step 5: Trim Excess Fabric
After the fabric is fully stapled in place, carefully trim off excess material with sharp scissors or a utility knife.
- Leave the staples intact—don’t cut too close or risk the fabric loosening later.
- Take your time trimming near corners and edges for a clean line.
Step 6: Add Decorative Touches (Optional)
Decorative elements can elevate your chair and tie it beautifully into your home’s style.
- Upholstery tacks or nailhead trim add vintage or rustic charm when aligned carefully along edges.
- Piping or welt cord gives a tailored, professional finish, especially for traditional or Victorian styles. You can sew these on or purchase pre-made trim.
- If your chair has removable cushions, consider sewing new cushion covers with zippers for easy cleaning and interchangeability.
- Button tufting, ribbons, or other fabric embellishments are also options depending on your style preference.
How Do You Match Upholstery Details to Your Architectural Style?
Details like trim, buttons, and finishes are what really personalize your chair and help it blend seamlessly with your home’s architecture.
- Trim and Piping:
- Victorian or traditional homes benefit from intricate braided or colored piping that adds richness and texture.
- For modern or minimalist homes, simple, clean piping in matching or contrasting colors works best to keep a sleek look.
- Buttons and Tufting:
- Button tufting is classic and formal, perfect for traditional, Victorian, or mid-century styles. It adds depth and dimension to upholstery.
- Minimalist or contemporary styles usually avoid tufting for a smooth, streamlined appearance.
- Nailhead Trim:
- Nailhead or upholstery tacks add rustic, farmhouse, or industrial character. Use them to outline arms, seats, or backs for visual interest.
- Choose finishes like antique brass, bronze, or matte black to complement your home’s hardware and color palette.
- Leg Finishes:
- Sand and refinish wooden legs to refresh their appearance or match stain tones used elsewhere in your home.
- Painted metal legs can be sprayed or brushed in colors that coordinate with your decor for a cohesive feel.
- For vintage chairs, preserving original leg finishes adds authenticity.
What Are Common Mistakes to Avoid When Reupholstering?
Avoiding these pitfalls will save you time, money, and frustration:
- Using fabric that’s too thin or flimsy: Upholstery fabric needs to be durable and tightly woven. Thin fabrics can wear out quickly or tear during stapling.
- Not leaving enough fabric margin: Leaving too little extra fabric can make stapling difficult and risk fraying or fabric pulling loose over time.
- Stapling unevenly: Uneven stapling can cause wrinkles, puckering, or loose spots. Always staple from the center outward on opposite sides.
- Ignoring the chair frame or foam condition: Fix loose joints or replace worn foam before upholstering. Otherwise, the chair won’t feel sturdy or comfortable after reupholstery.
- Rushing without proper measurements: Precise measuring and making templates prevents costly mistakes and fabric waste.
- Choosing fabric that clashes with your home’s style: Even the best upholstery skills can’t save fabric that feels out of place. Coordinate fabric choice with your architectural and interior style for best results.
How Can You Care for Your Newly Reupholstered Chair?
Your new chair deserves care to keep it looking beautiful for years:
- Vacuum regularly: Use a vacuum with an upholstery attachment to remove dust, crumbs, and pet hair without damaging the fabric.
- Spot clean spills immediately: Blot (don’t rub) spills with a clean cloth. Use mild soap and water or fabric cleaner recommended for your material. Always test cleaners on a hidden spot first.
- Rotate cushions: If your chair has removable cushions, rotate them regularly to even out wear and prevent sagging.
- Avoid direct sunlight: Prolonged sun exposure fades fabric and weakens fibers. Position chairs away from direct sunlight or use window coverings.
- Professional cleaning: Consider hiring upholstery cleaning professionals once a year or as needed to deep clean and maintain fabric integrity.
Final Thoughts: Is Reupholstering Worth It?
Reupholstering a chair is an excellent way to customize your furniture while honoring the architecture and vibe of your home. It’s a satisfying project that allows creativity, preserves quality pieces, and delivers a personalized look that store-bought chairs rarely achieve.
Whether you’re a first-time DIYer or a seasoned crafter, following these steps can help you transform a simple chair into a statement piece that truly belongs in your home.
If you’re ready to start your reupholstery project, remember that patience and attention to detail are key. Choose your fabrics thoughtfully, prep thoroughly, and enjoy the process of making something uniquely yours!